


Our other french baguette recipe - from Weekendbakery.com
75% hydration dough
Ingredients for the poolish
380 g wheat (bread) flour
380 g cold water (straight from the tap)
0.7 g instant yeast* (twice the amount in winter!)
Ingredients for the baguettes
1 batch makes 4 baguettes
all the poolish from step 1
380 g wheat (bread) flour
190 g water at room temperature
12 g (sea) salt
2 g instant yeast
* In winter our bakery is between 16ºC / 61ºF and 18ºC / 65ºF, so we use more yeast to get the poolish going. In summer the average temperature is between 21ºC / 70ºF and 25ºC / 77 ºF so we can use less yeast to get the same result. So take the temperature of your surroundings into account to determine your amount of yeast.
Making the poolish
In a bowl stir together 380 grams of bread flour with 380 grams of cold water with the yeast (see above). Mix until you have a consistency that looks like dough-like batter. Cover the bowl and leave for 12 hours at room temperature. So if you want to begin your baguette baking in the morning, you can make your poolish the evening before.
Making the baguettes
In the bowl of your standing mixer, combine the poolish with the other ingredients and knead for 6 minutes. Cover and leave to rest for 40 minutes. Now turn out the mass onto your working surface and stretch and fold, doing two to three sets of letter folds (one set = right over left, left over right, bottom over top, top over bottom) depending on how well your dough cooperates. Stop if the dough is not willing to stretch anymore. Put the dough in a greased bowl, cover and again leave to rest for 40 minutes.
Turn out the dough and stretch and fold a second time, doing one to two sets of letter folds.
Directly after the stretch and fold, divide the dough in 4 equal parts. Now you are going to pre-shape the dough parts one by one by carefully stretching the corners, making a rectangle of each of the 4 pieces, and rolling them up. Try to make your rectangle and roll as even as possible without fussing too much with the dough. Use enough flour to handle the dough, but try to keep it to a minimum. Cover and leave to rest for 10 minutes so the gluten can relax.
Preheat your oven to 240ºC / 465ºF (at what stage you preheat your oven depends on how long it takes for your oven to heat through, some take 30 minutes, some, like ours, with stone floors take a lot longer, up to two hours.)
Take a roll of the pre-shaped dough and sprinkle it with a little flour and softly press it into a rectangle with a short and a long side. The more even the rectangle the nicer the baguette will look in the end. With a dough scraper make sure the dough is not stuck to your work surface with the help of a little bit of flour.
With a dough scraper, flip 1/3 of the long side onto itself and press down the seam, with the heel of your hand, to get some tension on the outside of the dough, now repeat it two more times until you have a roll shape. Make a rolling motion with your hands from the center to the sides with a soft touch to make the baguette longer and to try and make nice pointy ends on both sides of the baguette.
This baguette shaping video on the King Arthur Flour website by Jeffrey Hamelman is really worth a closer look if you are in need of more baguette shaping support.
Practice makes perfect, do not be hard on yourself, it is not an easy job, even with this slightly less sticky dough, compared to the 80% hydration we use for our other baguette recipe.
It would be wise to measure the length of your oven floor, so your baguettes will fit. Normally a baguette is about 60 cm / 23.6 inches long. We have to make ours 45 cm / 17.7 inches maximum so they will fit into our oven.
Place the baguettes in a couche / proofing cloth made of linen or in a baguette pan, or something of your own invention, but make sure the baguettes have enough side support to hold their shape. Cover them and leave to proof for 35 minutes.
Baguettes resting in their couches (beds) made of thick proofing linen
To check if the baguettes are ready, dip your finger in some flour and gently poke your dough.
If the hole disappears completely: under-proofed
If the hole dent pops half way back out: proofing is just right
If the hole stays entirely dented in: over-proofed
Use some semolina or rice flour to prepare your board
Baguettes did final proofing in their couches made from linen cloth
Transferring the baguettes with a flipping board
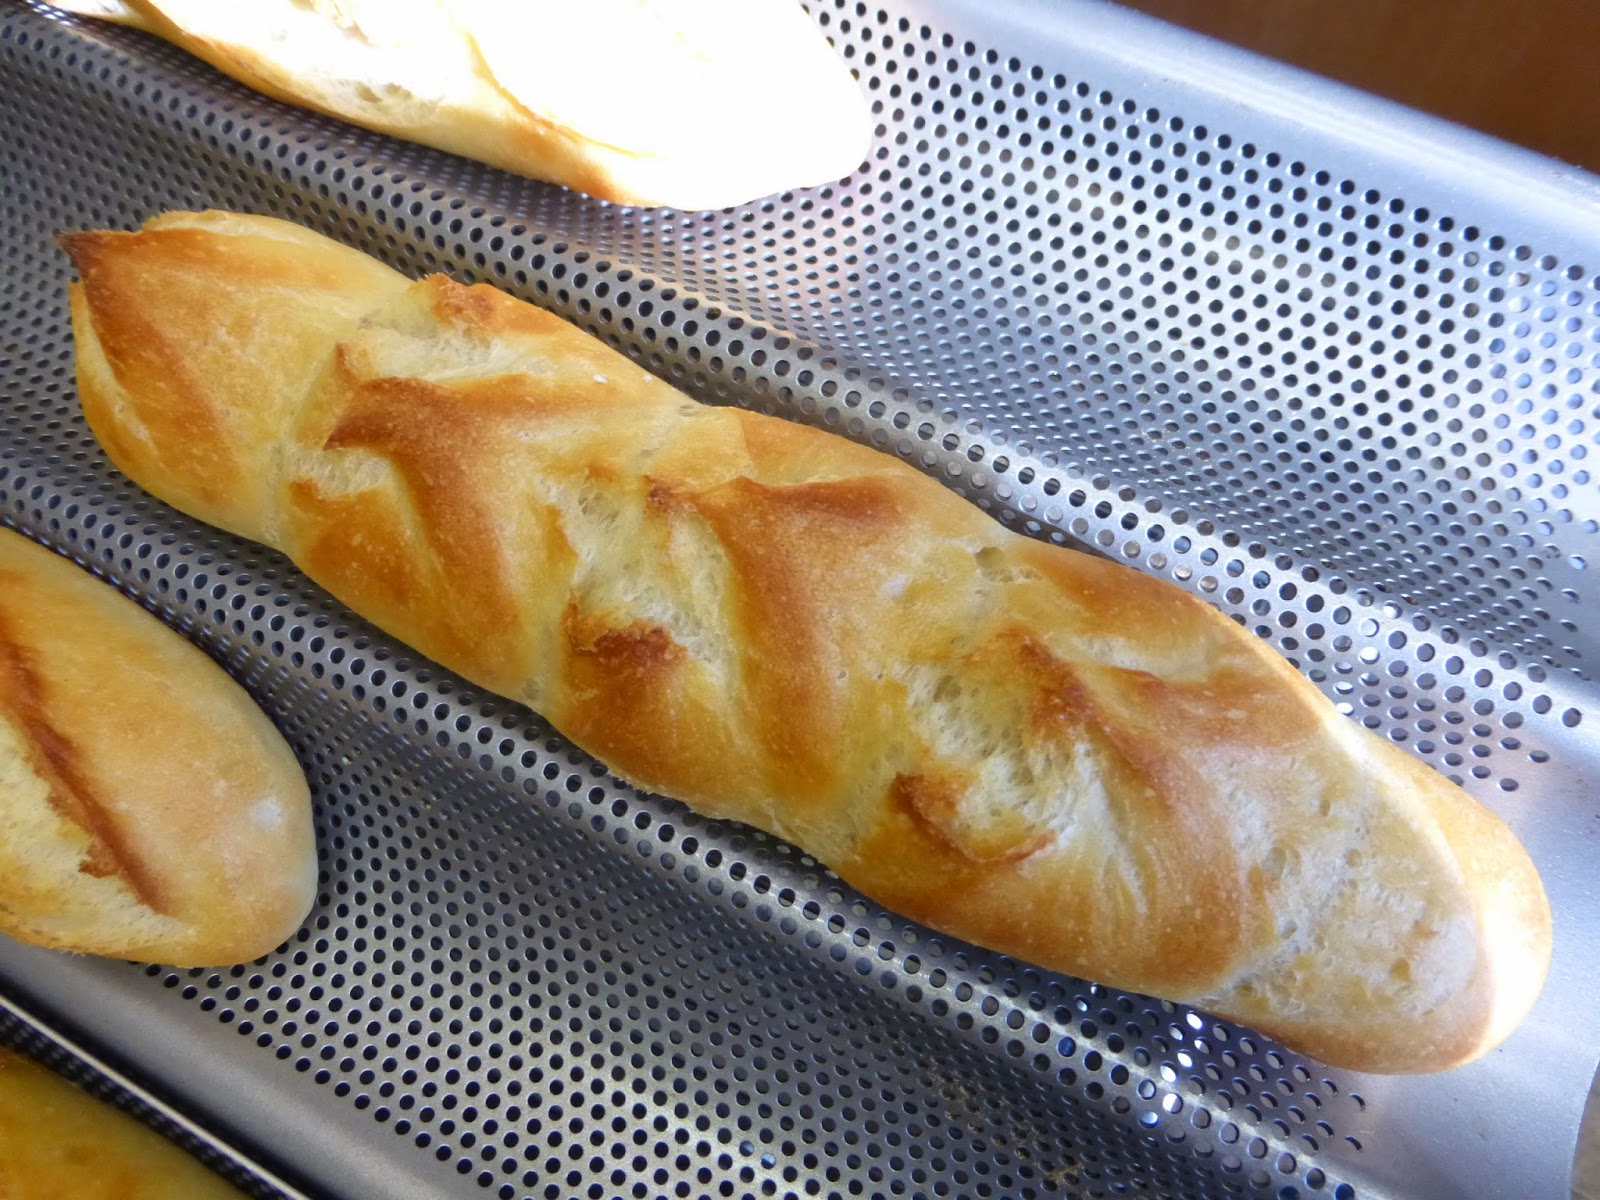
Scoring baguettes takes a bit of practice
Baguettes into the oven directly on the hot stones
Score the top of the baguettes with a lame/bread scoring tool. Cut as straight along the long axis of the loaf as possible. Mentally divide the baguette into lengthwise thirds, and keep the cuts within the middle third. Overlap the cuts by about one third of their length, while holding the knife at a 30 degree angle. Also check out this very useful video on proper baguette scoring.
Do not use this steam generating method with your normal household oven! Check our oven tips first
You can practice the scoring strokes with a pencil on a piece of paper or a kitchen paper roll first.
Bake in the preheated oven for 27 minutes. Leave to cool on a wire rack.
To get a nice crust, try to create some steam in your oven by putting a small metal baking tray on your oven floor when you preheat the oven and pouring in half a cup of hot water immediately after putting the bread in the oven. Release some steam by setting your oven door ajar 5 minutes before the bread is ready. If you are going to create steam with a baking tray, you maybe also want to turn your oven temperature a bit higher, because you are going to lose some heat in the process.
You can showcase your baguette baking results in the ‘Your Loaves’ section on our website
Baguette time table
Day 1
Make poolish
Day 2
00:00 Mix ingredients 6 minutes
40 minute rest
00:46 – 2-3 letter folds
40 minute rest
01:26 – 1-2 letter fold + divide + pre-shape
10 minute rest
01:41 – shape + proof
35 minutes final proofing
02:20 – into the oven
Baking time 27 minutes
02:47 – take out and leave to cool
The crumb: the holes are slightly less impressive compared to the 80% hydration recipe, but still very nice texture and taste!
Original source:
http://www.weekendbakery.com/posts/o...guette-recipe/
với công thức 75% hydration dough này cũng rất dể làm .... mình tính và đong ra bằng cup và tsp để các chị em dể làm nha
75% hydration dough FRENCH BAGUETTES - over night and cold fermentation for better flavor breads
Polish/Starter/Bột Cái:
3.5 cup (380gr) bread flour (BF) - nếu dùng all purpose flour (APF) + 1/2 tsp gluten bột dai
1.5 cup (380gr) cold water (cho 1-2 cục nước đá vào nước rồi đong ra 1.5 cup)
1.5 tsp (0.7 gr) active dry yeast men nâu
**Trộn đều lên - đậy nắp - để ngoài bàn 1 tiếng - rồi đem để tủ lạnh qua đêm (hay ít nhất hơn 12 tiếng)
Bread Dough/Bột Bánh Mì:
3.5 cup BF (hay APF + 1/2 tsp gluten)
2 tsp muối Kosher
Bột cái thật lạnh trong tủ lấy ra (dùng hết bột cái)
3/4 cup nước lọc (room temperature)
1/2 tsp active dry yeast
**Lấy ra 1/4 cup bột (trong 3.1/2c.) hoà với muối = để ngoài
**Lấy Yeast cho vô nước hoà lên cho tan (với 1/2 tsp đường để giúp men thức giậy mau, nếu là mùa đông trong nhà nhiệt độ dưới 70*F) -- sau 5 phút tan và sùi bọt thì khuấy lên.
**Cho nước Yeast vào bột cái khuấy lên.
**Cho bột còn lại vào bồn + bột cái = để số 2 đánh 5 phút rồi cho số 3 đánh 25 phút = tổng cộng thời gian đánh máy là 30 phút (trong thời gian này ngừng máy 2-3 lần kéo bột xuống khỏi que để bột được đánh và nhồi đều)
**Thoa bột áo lên bột và bàn - trút bột mới đánh mịn ra bàn -- với cái dough scraper và ít bột áo - gấp bột khoãng 25 lần - bột sẽ dai hơn và không còn dính tay nữa.
**Cho bột vào thau ủ - đậy nắp ủ 1 tiếng hay tới 1 tiếng 15 phút cho tới khi bột nỡ gấp đôi (trong thời gian này khi vừa ủ được 15 phút đầu thì mỡ nắp ra gấp bột 8 lần rồi úp lại ủ tiếp - làm 1 lần nữa gấp bột và nghỉ cho tới hết thời gian 1 tiếng.
**Thoa ít bột áo - cho bột ra bàn -- chia bột -- vo tròn -- đậy khăn để nghỉ 10 phút
**Nắn bánh mì - để lên khăn ủ baker couche - đậy lên 1 cái khăn nữa ủ 30-45 phút khi thấy bánh nỡ tròn lại
thử bột xem có thể nướng được chưa =
If the hole disappears completely: under-proofed
If the hole dent pops half way back out: proofing is just right
If the hole stays entirely dented in: over-proofed
**Thấy gần được thì mỡ lò nóng 450*F -- khi nóng thì chuyển bánh mì từ khăn qua khay nướng
**Rạch mặt bánh mì - xịt nước lên bánh mì -- cho vô lò ngay
**Cho nước sôi vào steam bake khay để ngăn dưới == đóng cửa lò lại
**Bake 5 phút ở lửa 450*F -- rồi hạ oven xuống 425*F Bake tiếp 20 phút bánh vàng vừa (vì khi ăn sẽ nướng lại) hoặc 25 phút nếu là ăn ngay sau khi nướng xong.
**Bánh mì đem ra để nguội mới cắt ăn.
chúc chị em làm bánh mì ưng ý và thành công.

Chúc mọi gia đình được no ấm!
No comments:
Post a Comment